How to Fix Low Water Pressure in a Kitchen Sink: A Practical Checklist
How to Fix Low Water Pressure in a Kitchen Sink
Low water pressure in a kitchen sink is annoying, but most causes are simple: a clogged aerator, a partially closed valve, or a minor supply issue. With a basic kitchen plumbing checklist, you can usually diagnose and fix the problem in under an hour.
Key Takeaways
- Check whether the pressure problem affects hot, cold, or both lines to narrow the cause.
- Most fixes start with cleaning the faucet aerator and checking shut-off valves under the sink.
- Use a simple safety checklist before you touch any plumbing or tools.
- If you find leaks, corroded pipes, or discolored water, stop and call a licensed plumber.
Start with a Quick Diagnosis
Before grabbing tools, confirm exactly what is happening at the sink. This saves you from taking apart parts that are working fine.
Turn on the hot water fully, then the cold, then both together. Compare the flow to another faucet in your home, such as a bathroom sink or tub.
If only the kitchen sink is weak, the issue is likely in the faucet, aerator, or the shut-off valves under that sink, not the main line.
Safety and Caution Checklist
Even simple kitchen plumbing work needs a bit of caution. Use this quick checklist before you start.
- Clear out the cabinet under the sink so you have room to work.
- Place a towel or shallow pan under valves and connections to catch drips.
- Turn off the hot and cold shut-off valves if you will disconnect any lines.
- Unplug any nearby appliances and keep electric cords away from water.
- Wear work gloves and eye protection when using tools or chemicals like vinegar.
Step-by-Step Kitchen Plumbing Checklist
Follow this ordered list in sequence. Stop if you encounter heavy corrosion, damaged parts you cannot identify, or anything that looks unsafe.
- Test other fixtures. Confirm if low pressure is only at the kitchen sink or across the house. If all fixtures are weak, you may have a main supply or municipal water issue and should contact your water supplier or a plumber.
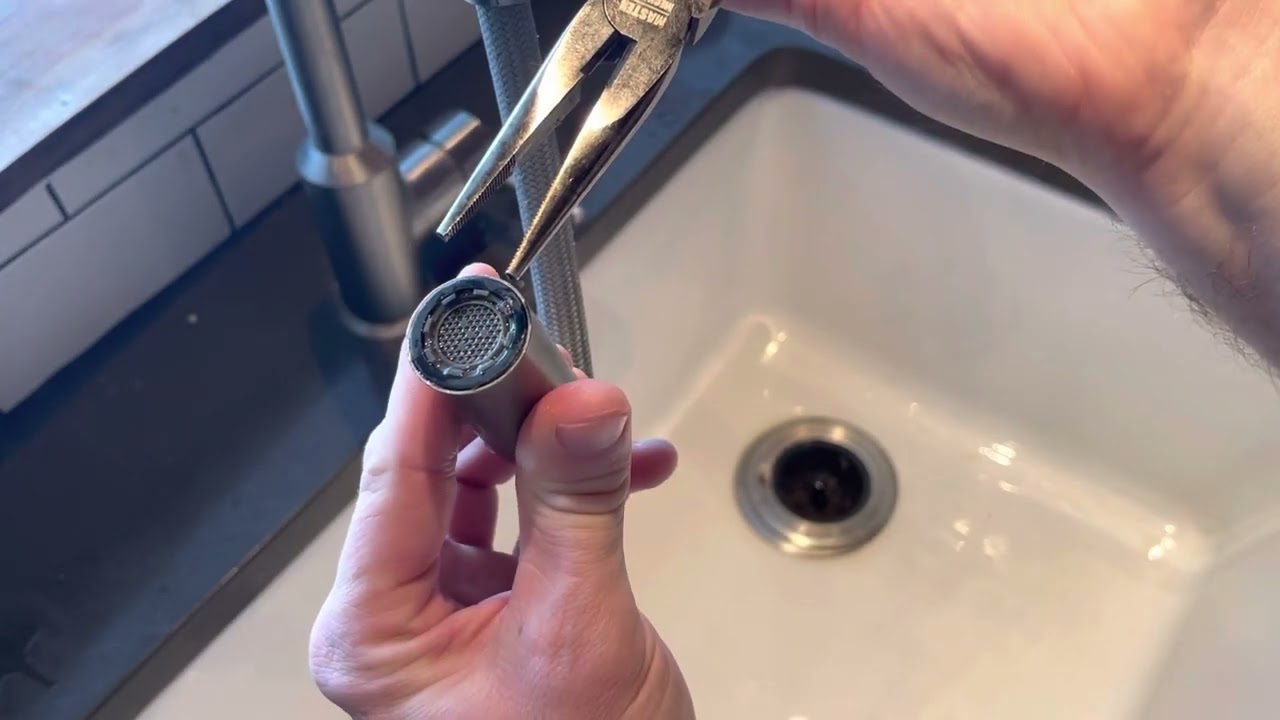
- Inspect the faucet aerator. Unscrew the small cap at the tip of the faucet spout by hand or with pliers wrapped in tape to avoid scratching. Check for sand, scale, or debris clogging the screen.
- Clean the aerator. Rinse the screen parts under running water and scrub gently with an old toothbrush. For mineral buildup, soak the pieces in white vinegar for 15–30 minutes, then rinse and reassemble.
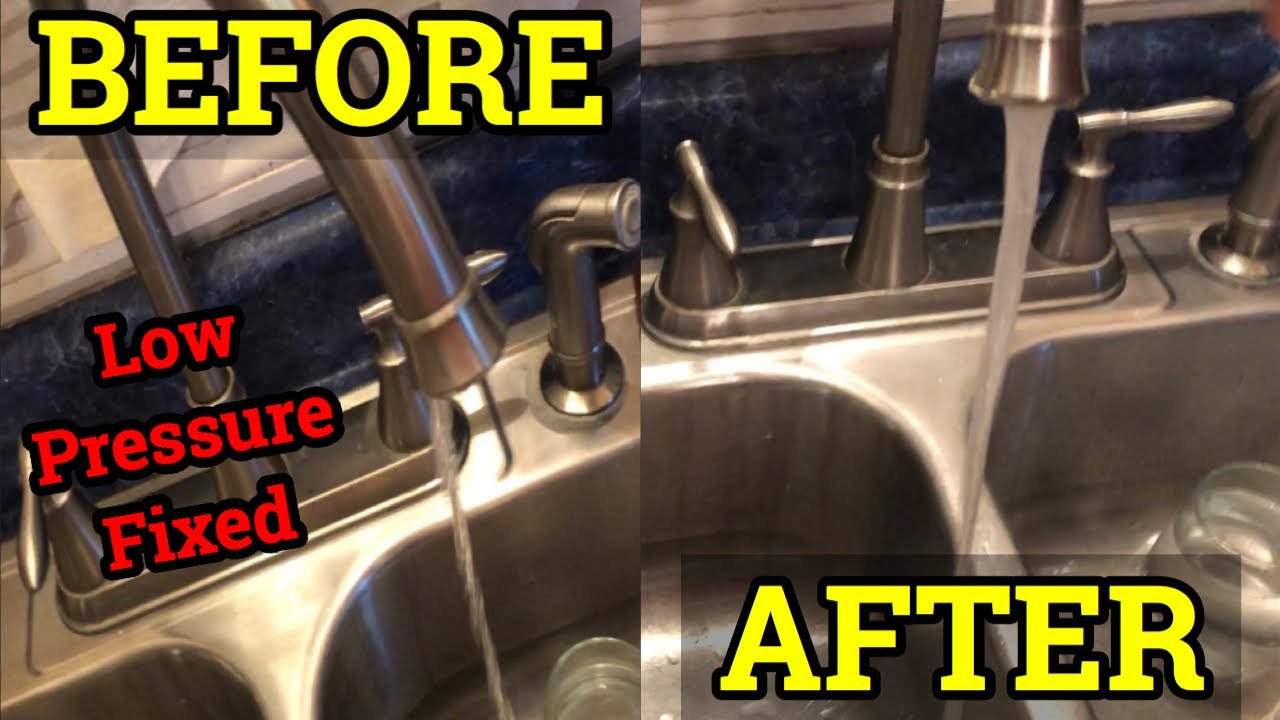
- Test flow without the aerator. Briefly turn on the faucet with the aerator removed. If the pressure is strong, you have confirmed the aerator was the main problem; reinstall it after cleaning.
- Check shut-off valves under the sink. Make sure the hot and cold valves are fully open by turning them counterclockwise until they stop. Partially closed valves are a very common reason for weak flow after repairs or new installations.
- Look for kinked or damaged supply lines. While under the sink, inspect the flexible hoses that run from the valves to the faucet. Straighten any kinks and check for wet spots, rust, or bulges that may indicate internal blockage.
- Flush the faucet cartridge (if accessible). Turn off both shut-off valves. Follow the faucet maker’s instructions (often available online by brand and model) to remove the handle and cartridge. Rinse the cartridge and valve body to clear debris, then reinstall carefully.
- Check for hidden debris at the supply connections. With water off, disconnect one supply line at a time from the shut-off valve. Briefly open the valve into a bucket to confirm strong flow from the wall side, then reconnect the line securely.
- Bleed air and re-test. Turn the valves back on slowly and run the faucet on both hot and cold for 30–60 seconds. Listen for sputtering and watch for leaks under the sink.
- Decide if it is time to call a plumber. If pressure is still low, or if you notice rusty water, persistent leaks, or very old pipes, contact a licensed plumber. Document what you tried so they can diagnose faster.
Understanding Common Causes of Low Kitchen Pressure
Several everyday issues cause low pressure at a kitchen sink, especially in areas with hard water. Knowing the most likely culprits makes troubleshooting less stressful.
- Mineral buildup: Hard water leaves scale inside aerators, cartridges, and small passages.
- Debris after repairs: Work on main lines or water heaters can send grit into your faucet.
- Valve issues: Old or partially closed shut-off valves may restrict flow.
- Supply line problems: Flexible hoses can kink or collapse over time.
When a DIY Fix Is Not Enough
Simple clogs and minor valve issues are realistic DIY tasks for most homeowners. But some warning signs point to bigger plumbing problems.
- Brown or yellow water, especially from the hot side only.
- Water stains or dampness in the cabinet, even when the faucet is off.
- Very old galvanized pipes or evidence of corrosion on fittings.
- Low pressure in multiple fixtures that appears suddenly.
In these cases, a licensed plumber can inspect for corroded pipes, failing pressure regulators, or hidden leaks. A professional repair protects your cabinets, floors, and appliances from slow damage.
Make a Simple Preventive Routine
Once your pressure is back to normal, a short routine helps keep it that way. You do not need special tools or advanced skills.
- Clean the aerator every few months, especially in hard-water areas.
- Open and close shut-off valves once or twice a year to keep them from seizing.
- Do a quick visual check under the sink monthly for moisture or rust.
- Keep a written kitchen plumbing checklist taped inside the cabinet for quick reference.
These habits take only a few minutes but can prevent sudden drops in pressure and catch leaks early. Over time, that saves both water and repair costs.
Clarity in writing comes from structure, not length.